Ready to transform your video editing from a tedious chore into a streamlined, creative breeze? This guide dives deep into efficient workflows for both KineMaster and CapCut, two popular mobile video editing apps. We’ll cover everything from project setup and asset management to mastering the timeline and leveraging those amazing built-in features. Get ready to unlock your inner Spielberg (or at least, your inner efficient editor!).
Whether you’re a seasoned pro or just starting out, we’ll equip you with the strategies and shortcuts to conquer your video editing projects faster and with less frustration. From organizing your files like a pro to mastering keyboard shortcuts and optimizing export settings, we’ll explore practical tips and tricks that will dramatically improve your workflow and free up more time for the fun part – the creative process!
Project Setup and Organization in KineMaster and CapCut
Efficient video editing isn’t just about slick transitions and fancy effects; it’s about a well-organized workflow. A structured approach to project setup and asset management can save you hours of frustration and dramatically improve your productivity, whether you’re using KineMaster or CapCut. Let’s dive into how to master this crucial aspect of video editing.
A streamlined workflow begins long before you even open your editing software. Careful planning and consistent organization are key to avoiding the dreaded “where did I put that clip?” moment. This section will Artikel best practices for file naming, folder structures, and leveraging the project management features within both KineMaster and CapCut.
Optimal Project Folder Structures
Adopting a consistent folder structure is vital for maintaining a clear and manageable project. Imagine searching through hundreds of files without a system – a nightmare! A well-defined structure allows you to quickly locate assets and speeds up the entire editing process. This significantly reduces the time spent hunting for files and allows you to focus on the creative aspects of video editing.
- Project-Based Folders: Create a separate folder for each video project. This keeps all related assets – footage, audio, graphics, and exported versions – neatly contained.
- Asset Subfolders: Within each project folder, create subfolders for different asset types: “Footage,” “Audio,” “Graphics,” “Lower Thirds,” etc. This further streamlines organization.
- Version Control: Consider creating subfolders for different versions of your project (e.g., “Version 1,” “Version 2,” “Final”). This is particularly useful for collaborative projects or when making significant changes.
Consistent File Naming Conventions
Inconsistent file names are a recipe for disaster. Imagine trying to find “clip_003_take2_final.mp4” amongst dozens of similarly named files. A clear naming convention helps you quickly identify files and prevents confusion.
- Descriptive Names: Use descriptive names that clearly indicate the content of the file. For example, instead of “clip1.mp4,” use “interview_john_smith_intro.mp4”.
- Date-Based Naming: Include the date in the file name (e.g., “2024-10-27_broll_market.mp4”). This is helpful for sorting and finding footage chronologically.
- Sequential Numbering: For similar clips, use sequential numbering (e.g., “shot_001.mp4,” “shot_002.mp4”).
Examples of Effective File Organization Strategies
Here are a few examples illustrating effective file organization for a video project titled “Product Demo”:
- Example 1 (Simple): A single folder named “Product Demo” containing all assets.
- Example 2 (Intermediate): A “Product Demo” folder containing subfolders: “Footage,” “Audio (Music),” “Audio (SFX),” “Graphics,” “Final Render”.
- Example 3 (Advanced): A “Product Demo” folder with subfolders: “Footage” (containing further subfolders like “B-Roll,” “Interviews,” “Screen Recordings”), “Audio,” “Graphics,” “Lower Thirds,” “Final Renders” (with subfolders for different resolutions).
Comparison of KineMaster and CapCut Project Management Features
| Feature | KineMaster | CapCut | Notes |
|---|---|---|---|
| Project Organization | Uses folders within the app; allows for asset import/export. | Relies on device file system; simpler organization within the app. | KineMaster offers more robust in-app organization. |
| Asset Management | Provides tools for managing media assets within the project timeline. | Offers basic asset management features, primarily through the device’s file system. | Both apps allow importing assets, but KineMaster has slightly more refined control. |
| Version Control | Offers save-as functionality to create project backups. | Relies on manual saving and naming conventions for version control. | KineMaster offers a more direct approach to versioning. |
| Collaboration | Limited built-in collaboration features. | Limited built-in collaboration features. | Both apps primarily focus on individual editing workflows. |
Mastering the Timeline
Smooth sailing on the video editing seas requires a well-organized timeline. Think of it as your command center – a chaotic timeline leads to a chaotic edit. Mastering timeline organization in KineMaster and CapCut is key to efficient video production, saving you valuable time and frustration. Let’s dive into some strategies to make your editing flow effortlessly.
Timeline Arrangement for Smooth Workflow
Efficient timeline arrangement is about intuitive placement and logical grouping of your video clips. Imagine a symphony orchestra – each instrument section is grouped together for clarity. Similarly, group related clips together in your timeline. For example, keep all your B-roll footage together, separate from your main interview clips. This allows you to easily find and manipulate specific segments without getting lost in a sea of clips. In both KineMaster and CapCut, you can use color-coding or naming conventions to further enhance organization. For instance, all clips related to a specific scene can be labeled consistently, or assigned a particular color.
Keyboard Shortcuts for Faster Editing
Keyboard shortcuts are your secret weapon for boosting editing speed. Instead of constantly reaching for your mouse, learn the essential shortcuts for both KineMaster and CapCut. For example, the common ‘play’ and ‘pause’ keys (spacebar) are universal, but learning shortcuts for cutting, adding transitions, and adjusting clip lengths will dramatically improve your efficiency. Imagine the time saved by quickly trimming clips with a keystroke instead of using the mouse. A quick online search for “KineMaster keyboard shortcuts” or “CapCut keyboard shortcuts” will reveal a treasure trove of time-saving commands.
Efficient Use of Layers and Transitions
Layers and transitions are fundamental tools for creating dynamic and engaging videos. In KineMaster and CapCut, layers allow you to overlay text, graphics, or additional video clips on top of your primary footage. Efficiently using layers requires careful planning. Start with your base layer (your main video), then strategically add other layers. Avoid overcrowding your timeline with excessive layers, as this can slow down your computer and make editing cumbersome. Similarly, transitions should be used sparingly and purposefully to enhance the flow and pacing of your video. Overuse of transitions can create a jarring effect, detracting from your message. Choose transitions that seamlessly connect your clips and complement the overall tone and style of your video.
Nesting and Grouping for Complex Projects
For larger projects with numerous clips and layers, nesting and grouping become indispensable. Nesting involves creating a group or “clip” from a collection of other clips and effects, essentially treating them as a single unit. This simplifies the timeline and allows for easy manipulation of complex sequences. For example, you could nest all the elements of a specific scene (clips, transitions, effects) into one group, making it easier to move or adjust the entire scene as a single entity. Both KineMaster and CapCut offer this functionality, significantly streamlining the management of large and complex projects. Grouping helps in keeping the timeline organized and manageable, especially when dealing with multiple sequences or versions of a video.
Optimizing Asset Management

Let’s face it, a cluttered digital workspace is the enemy of efficient video editing. No matter how slick your editing software is, if you can’t find your clips, your project will grind to a halt. Optimizing your asset management is crucial for a smooth and speedy workflow in KineMaster and CapCut. This section will equip you with strategies to tame the chaos and conquer your media library.
Efficient asset management isn’t just about finding things quickly; it’s about saving time, reducing stress, and ultimately creating better videos. Imagine spending hours hunting for that perfect B-roll shot when you could be refining your edits. By implementing the techniques below, you’ll reclaim precious time and focus on what truly matters: storytelling.
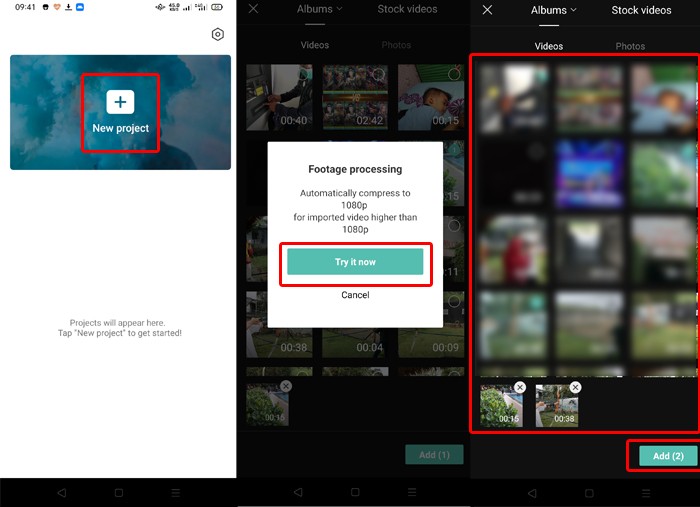
Importing and Managing Media Files
Before you even open KineMaster or CapCut, consider how you’ll organize your source files. A well-structured file system is the foundation of efficient asset management. Create clearly labeled folders for each project, separating video clips, audio files, and images. Within each project folder, use subfolders to categorize footage (e.g., “interviews,” “B-roll,” “establishing shots”). When importing into your editor, use the same naming conventions you’ve established in your file system. This consistency will save you countless hours of searching later. For example, a project titled “Summer Vacation” might have subfolders like “Summer Vacation/Video Clips/Beach Scenes” and “Summer Vacation/Audio Files/Music Tracks”. This hierarchical structure ensures easy navigation and retrieval of assets.
Pre-Editing Footage
Pre-editing, often overlooked, is a game-changer. Before importing everything into your editor, take a few minutes to cull your footage. Review your raw clips and select only the best takes. Trim away unnecessary sections, removing any unwanted silences or camera shake. This pre-selection significantly reduces the amount of material you’ll need to manage within your editing software, resulting in a cleaner, more efficient editing process. Think of it as pre-cleaning your ingredients before starting to cook a meal – you wouldn’t want to work with all the excess packaging and scraps, would you?
Organizing Audio and Video Assets
Effective organization of audio and video assets is paramount. Here’s a breakdown of effective strategies:
- Consistent Naming Conventions: Use a system of descriptive names, such as “Interview_John_Take1.mp4” or “Music_Upbeat_01.wav,” to easily identify your files. Avoid generic names like “clip1.mp4” or “audio.wav.”
- ing and Tagging: For large projects, add s or tags to your files. This allows for quick searches based on content, location, or mood. Most operating systems allow for file tagging, and some video editing software has built-in tagging capabilities.
- Color-Coding Folders: Use color-coded folders to visually categorize your assets. For instance, blue for interview footage, green for B-roll, and red for sound effects. This visual cue enhances quick identification.
- Separate Audio and Video: Keep audio and video files in distinct folders to avoid confusion and simplify your workflow. This makes locating specific soundtracks or voiceovers easier.
Managing Different Project Versions
Saving multiple versions of your project is crucial for flexibility and safety. This prevents accidental overwriting and allows you to revisit previous edits.
- Regular Saves: Save your project frequently, ideally every 15-30 minutes, to avoid losing work due to software crashes or unexpected interruptions.
- Version Control: Create distinct copies of your project at key milestones. Name these versions clearly, such as “Summer Vacation_v1_rough_cut” or “Summer Vacation_v2_final_edit”. This allows you to compare different versions and revert to previous stages if necessary.
- Cloud Storage: Utilize cloud storage services (such as Google Drive, Dropbox, or iCloud) to back up your project files. This protects your work against hardware failure or accidental deletion.
Leveraging Built-in Features for Efficiency

Unlocking the true power of KineMaster and CapCut goes beyond basic editing. Mastering their built-in features is the key to a significantly faster and more streamlined workflow. This section delves into the speed and ease of use comparisons, highlighting the most time-saving features and exploring the advantages and disadvantages of relying on these built-in tools versus external plugins.
KineMaster and CapCut Feature Comparison: Speed and Ease of Use
KineMaster and CapCut both offer a robust suite of built-in features, but their implementation and user experience differ. KineMaster, with its more professional-oriented interface, provides a greater degree of control and customization, often leading to a steeper initial learning curve but ultimately offering more nuanced editing capabilities. CapCut, on the other hand, prioritizes ease of use and intuitive design, making it quicker to learn and ideal for simpler projects. For example, KineMaster’s chroma keying features offer finer adjustments, resulting in a cleaner final product but requiring more steps, while CapCut’s simplified version is faster but might yield less precise results. The speed difference is most noticeable in complex tasks, where KineMaster’s advanced features, while powerful, can require more time investment.
Time-Saving Features in KineMaster and CapCut
Several built-in features drastically reduce editing time. In KineMaster, the multi-layer timeline and precise keyframe controls allow for complex animations and transitions to be created efficiently. Its robust audio editing tools, including audio ducking and precise volume adjustments, minimize the need for external audio editing software. CapCut excels with its intuitive AI-powered features. Its automatic captioning and scene detection significantly speed up the post-production process. The ability to quickly add transitions and effects with simple gestures also contributes to a faster workflow. For instance, KineMaster’s ability to batch-process multiple clips with consistent adjustments can save hours compared to manual adjustments for each clip individually. CapCut’s “Magic Effects” can instantly transform a clip with various filters and styles, again reducing the manual workload.
Automated Features: Auto-Captioning and Auto-Sync
Automated features like auto-captioning are game-changers. CapCut’s auto-captioning, powered by AI, is remarkably accurate and fast, greatly reducing the time spent manually adding captions. While KineMaster offers captioning, it might require more manual adjustments for accuracy. Auto-sync features, though not as prevalent, are incredibly useful for aligning audio and video. While neither app offers fully automated, perfect audio syncing, both provide tools that significantly simplify the process. For example, CapCut’s “Audio Sync” feature often requires minimal manual adjustments, while KineMaster might necessitate more precise fine-tuning. This speed difference is particularly apparent in projects with multiple audio tracks or complex audio-visual synchronization needs.
Built-in Features vs. External Plugins: A Comparison
| Feature | Built-in Features (KineMaster/CapCut) | External Plugins | Considerations |
|---|---|---|---|
| Ease of Use | Generally easier to learn and integrate into the workflow. | Can require additional software installation and learning curves. | Choose based on your technical skills and project complexity. |
| Cost | Included in the app subscription/purchase. | Often require separate purchase or subscription. | Weigh the cost of plugins against the time saved. |
| Functionality | Offer a solid range of essential tools. | May offer highly specialized features not found in built-in tools. | Assess whether specialized features justify the extra cost and complexity. |
| Stability | Generally more stable as they are tightly integrated with the app. | Can sometimes cause compatibility issues or instability. | Thoroughly research plugin compatibility and reviews before using. |
Export and Sharing Best Practices
So, you’ve painstakingly crafted your masterpiece in KineMaster or CapCut. Now comes the final, crucial step: exporting and sharing your video. Getting this right ensures your hard work shines, reaching your audience in the best possible quality and format. Let’s dive into the best practices for a smooth and efficient export process.
Exporting your video involves more than just hitting the “export” button. The settings you choose significantly impact the final product’s quality, file size, and compatibility with different platforms. Understanding these settings and how to optimize them is key to a successful video upload.
Optimal Export Settings for Different Platforms
Different platforms have different recommended video specifications. YouTube, for instance, favors higher resolutions and frame rates for optimal viewing experience, while Instagram might prioritize shorter video lengths and specific aspect ratios. Failing to adhere to these platform guidelines can lead to your video looking distorted, pixelated, or even being rejected altogether.
- YouTube: Aim for 1080p (1920×1080) or higher resolution, a frame rate of 30 or 60 fps, and an H.264 codec for wide compatibility. Consider using a higher bitrate for better quality, but keep file size in mind.
- Instagram: Instagram supports various aspect ratios, but square (1:1) or vertical (9:16) videos are generally preferred. Resolution can range from 720p to 1080p, and a lower bitrate is often acceptable due to the platform’s compression.
- TikTok: Similar to Instagram, TikTok prioritizes vertical videos (9:16) with resolutions up to 1080p. Consider using a lower bitrate for faster uploads and smoother playback on mobile devices.
Methods for Compressing Videos Without Significant Quality Loss
Large video files can be a pain to upload and share. Compression reduces file size without drastically compromising quality. However, finding the right balance is crucial. Over-compression leads to noticeable artifacts and pixelation.
- Adjusting Bitrate: The bitrate determines the amount of data used per second of video. Lowering the bitrate reduces file size, but excessively low bitrates result in quality loss. Experiment to find the optimal balance for your needs. A good starting point is to reduce the bitrate by 10-20% from the original settings.
- Choosing the Right Codec: H.264 and H.265 are commonly used codecs. H.265 (HEVC) offers better compression ratios at similar quality levels compared to H.264, resulting in smaller file sizes. However, not all devices support H.265, so consider your target audience.
- Using Video Compression Software: Dedicated video compression tools offer advanced settings for fine-tuning compression levels, allowing for greater control over the trade-off between file size and quality. Examples include Handbrake (free and open-source) and Adobe Media Encoder (paid).
Creating Different Video Resolutions Efficiently
Often, you’ll need to create multiple versions of your video for different platforms. Instead of re-rendering the entire project multiple times, leverage your editing software’s export capabilities to create various resolutions simultaneously or from a master file. This saves valuable time and effort.
- KineMaster and CapCut’s Export Presets: Both apps offer preset options for various resolutions. Select the desired resolution directly from the export menu without re-editing the project. Many editing applications also allow for batch processing, further streamlining the creation of multiple resolutions.
- Exporting a Master File: Export your video at the highest quality and resolution you need. Then, use a dedicated video converter or compressor to easily create lower-resolution versions from this master file. This ensures consistency across all versions.
Step-by-Step Guide for Exporting and Sharing Videos
Here’s a clear, concise guide to ensure a smooth export and sharing process:
- Select Export Settings: Choose the appropriate resolution, frame rate, bitrate, and codec based on your target platform and desired quality.
- Preview Before Exporting: Always preview your export settings to ensure the video looks and plays as expected before committing to a full render.
- Export the Video: Initiate the export process. The rendering time depends on your video length, resolution, and computer processing power.
- Compress (if needed): If the file size is too large, use a compression method to reduce its size without significantly affecting quality.
- Upload and Share: Upload your video to your chosen platform, add a title, description, and any relevant tags or hashtags, and share with your audience!
Advanced Techniques for Enhanced Efficiency

Unlocking true video editing mastery in KineMaster and CapCut goes beyond the basics. This section delves into advanced techniques that significantly boost your workflow, allowing you to create professional-looking videos in less time. We’ll explore powerful color correction, efficient template usage, collaborative editing strategies, and streamlined text overlay creation.
Color Grading and Correction Techniques
Effective color grading and correction are crucial for establishing mood and enhancing visual appeal. In both KineMaster and CapCut, you’ll find intuitive tools to adjust brightness, contrast, saturation, and more. Experiment with pre-set filters as a starting point, then fine-tune individual parameters to achieve your desired look. For example, a slightly desaturated look can create a vintage feel, while increased contrast adds drama. Consider using the color wheels to subtly shift hues or target specific color ranges for correction. Remember that subtle adjustments often yield the most professional results. Avoid drastic changes unless the stylistic effect is intentional.
Leveraging Templates and Presets
Both KineMaster and CapCut offer a wealth of templates and presets to jumpstart your projects. These pre-designed assets provide ready-made structures, transitions, and even color grading schemes, dramatically reducing setup time. Explore the available options, paying attention to styles that align with your project’s genre and tone. While using a template as a base, remember to customize it to maintain your unique brand identity. Don’t be afraid to experiment by combining elements from different templates to create something truly original. For example, you might take the intro sequence from one template and the transition effects from another.
Collaborative Video Project Workflow
While KineMaster and CapCut don’t have direct built-in collaboration features like real-time co-editing, efficient collaboration is still possible. One effective method is to export project files in intermediate stages and share them via cloud storage services like Google Drive or Dropbox. Team members can then download the project, make their edits, and re-upload the updated file. Clear communication and a well-defined workflow are crucial for success. Establish a system for version control and clearly delineate individual responsibilities to avoid conflicts. For instance, one person might handle the initial cut and basic color correction, while another focuses on adding sound effects and music.
Creating Visually Appealing Lower Thirds and Text Overlays
Lower thirds and text overlays are essential for adding context, identifying speakers, or highlighting key information. Both KineMaster and CapCut provide intuitive text tools. Experiment with different fonts, sizes, and styles to find what best complements your video’s aesthetic. Use animations to add a dynamic touch, but keep it subtle to avoid distracting from the main content. For example, a simple fade-in and fade-out effect can be very effective. Consider using background shapes or colors behind your text to improve readability and visual integration with your video. Ensure sufficient contrast between the text color and the background to maximize legibility.
Troubleshooting Common Workflow Issues

Video editing, even with user-friendly apps like KineMaster and CapCut, can sometimes throw curveballs. Unexpected crashes, glitchy exports, and frustrating performance hiccups are all too common. This section will equip you with the knowledge to tackle these challenges head-on, turning those frustrating moments into efficient problem-solving opportunities. We’ll cover common issues, their solutions, and preventative strategies to keep your workflow smooth.
Understanding the root cause of a problem is half the battle. Many issues stem from simple oversights, while others might require a deeper dive into app settings or system resources. We’ll explore both, offering clear, actionable solutions to get you back on track quickly.
Common KineMaster and CapCut Problems and Solutions
Let’s address some frequently encountered problems and their effective solutions. This table provides a concise reference guide for quick troubleshooting.
| Problem | Solution | Prevention Strategy | Further Notes |
|---|---|---|---|
| App Crashes/Freezes | Close unnecessary background apps, restart your device, check for app updates, and consider clearing the app’s cache and data (this will delete unsaved projects, so save frequently!). | Regularly restart your device, keep apps updated, and monitor your device’s RAM usage. | If the problem persists after trying these steps, consider reinstalling the app or contacting the app’s support team. |
| Video Export Errors | Ensure sufficient storage space, check your internet connection (for cloud-based features), and verify the export settings (resolution, bitrate, etc.). Try exporting at a lower resolution or bitrate if necessary. | Always check storage space before starting a large export. Use a stable internet connection when needed. | Experiment with different export settings to find the optimal balance between quality and file size. |
| Audio Synchronization Issues | Carefully review your audio and video clips on the timeline, ensuring they are aligned correctly. If using multiple audio tracks, check for any timing discrepancies. | Pay close attention to audio alignment during the editing process. Use visual cues on the timeline to maintain synchronization. | Consider using visual aids or markers to help maintain synchronization, especially when working with multiple audio layers. |
| Performance Lag/Slowdowns | Close unnecessary apps, reduce the resolution of your project, work with smaller video clips, and consider using proxy files for high-resolution footage. | Optimize project settings, use proxies for large files, and avoid unnecessary effects or transitions. | Working with lower resolution proxies can significantly improve performance without compromising final quality. |
| File Corruption | Save your project frequently, use reliable storage media (SD cards), and ensure that your device is not overheating. Try recovering the project from backups if available. | Regularly back up your projects to cloud storage or external drives. Avoid editing on devices with limited storage. | Data corruption is unpredictable, so proactive backups are crucial. |
Strategies for Preventing Workflow Bottlenecks
Proactive measures can significantly reduce the frequency and severity of workflow issues. Implementing these strategies will keep your editing process smooth and efficient.
- Regular Backups: This is paramount. Back up your projects frequently to a cloud service or external hard drive. Consider using version control systems if you’re working on extensive projects.
- Optimized Project Settings: Choose appropriate resolutions and frame rates that your device can handle. Avoid unnecessary effects and transitions that can bog down performance.
- Organized Asset Management: Create a clear folder structure for your media files. This makes it easy to locate assets and prevents confusion.
- Regular Device Maintenance: Keep your device’s operating system and apps updated. Regularly clear the cache and temporary files to free up space and improve performance.
- Efficient Editing Practices: Use keyboard shortcuts, learn the app’s features thoroughly, and break down large projects into smaller, manageable tasks.
General Inquiries
Can I use KineMaster and CapCut together for a single project?
Absolutely! You can, for example, rough-cut your video in one app and then fine-tune it in the other, leveraging the strengths of each.
What’s the best way to handle large video files?
For large files, consider using cloud storage services to manage your assets and avoid filling up your device’s memory. Pre-rendering sections can also help manage performance.
How can I avoid losing my progress?
Regularly save your project, and consider making backup copies. Cloud saving is a fantastic safeguard against data loss.
Are there any free alternatives to KineMaster and CapCut?
Yes! InShot and PowerDirector are popular alternatives, each with its own strengths and weaknesses. Experiment to find what works best for you.